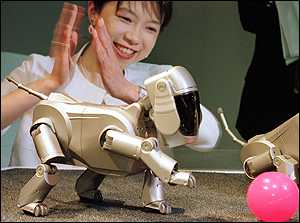
Click the picture above to see a movie of Sandwich in action.
Robot Building for Beginners targets creative individuals that have the time, budget, and enthusiasm for building their own robots from scratch, but don't have the background in electronics or machining.
Take a look at the chapter summaries that follow:
Chapter 1: Welcome Robot Inventor!
This chapter introduces robot anatomy, followed by a philosophy of building robots that may help you to be successful in happily finishing projects.
Chapter 2: Where to Obtain Tools and Parts
Here I list some of my favorite part suppliers, along with techniques for getting the most for your money.
Whenever a particular part is described, a list of suppliers is included, along with part numbers and prices. This allows you to easily follow along with the experiments, using the exact same parts I use.
Chapter 3: Safety
Rather than glossing over safety, I feel this subject is important enough to dedicate an entire chapter to it. Besides simple protective measures, I describe some product materials to avoid.

Chapter 4: Digital Multimeter
This chapter describes every possible multimeter feature I could find. At the end of the chapter, three actual meter advertisements are compared.
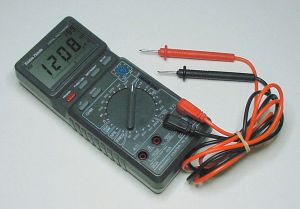
Digital multimeters are so important to robotics, that subsequent chapters provide illustrated, step-by-step instructions for using a multimeter in each stage of building and testing a robot.
Chapter 5: Numbers and Units
Have you ever wondered about the numbering scheme of certain parts? This chapter details some common measurement units and methods of labeling small parts.
Chapter 6: Robot Line-Following
With this chapter, so begins the heart of the book, with the introduction of
Sandwich, the line-following robot. A detailed tour is made of the features, dials, and switches on
Sandwich.
You, too, can build this cool and capable robot!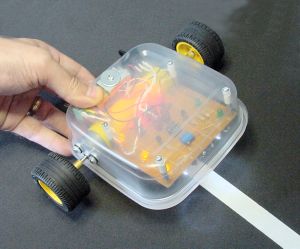
Chapter 7: Nine-Volt Batteries
Nine-volt batteries are quite popular with smaller, lunchbox-size robots. A comparison of common battery chemistries is made, along with revealing the manufacturer that stuffed their battery with polystyrene foam. The shock! The horror!

Chapter 8: Clips and Test Leads
No legitimate robot designer should be without a few pairs of alligator clips and hook test leads. Here you'll learn how to test them with the continuity mode on a multimeter.
Chapter 9: Resistors
This chapter describes the function of a resistor, in plain, simple terms. Step-by-step instructions are provided to test a resistor in the ohm-mode of a multimeter.

Chapter 10: LEDs
The LED chapter was a blast to take photographs for. You'll learn about the different selection criteria for LEDs, including the brightness myth. And of course, you'll see how to test LEDs.

Chapter 11: Power On!
At this point in the book, you have everything you need to make a power-indicator circuit. A simple schematic is included, with a complete explanation of each element.
Chapter 12: Solderless Prototyping
Prototyping a circuit is a must. The process is painless with a solderless breadboard. Also covered in this chapter are: wire strippers, solid wire, jumpers, and pliers.

Chapter 13: Solderless Breadboard Setup
A good setup for your breadboard is to connect a rechargeable 9 V battery and a switch, extend the buses, and add a power indicator. This chapter shows you how to do it, along with methods of testing voltages throughout the board with a multimeter.

Chapter 14: Variable Resistors
Now that you've prepared your breadboard, you can start experimenting with circuits that are too complicated for alligator clips. This chapter details variable resistors, such as fine-tuning potentiometers and photoresistor sensors.
Just like the Robot Room web site, each circuit described in this book is first shown in schematic (or wire diagram) form and then illustrated on an actual breadboard.

Chapter 15: Comparators
A comparator is a really useful chip. Often it is a supplemental component used to preprocess sensor data for a microcontroller on a robot. In this case, the comparator is the brain of the line-following robot.

Chapter 16: Transistor Switches
A working knowledge of transistors is necessary to drive robot motors. Instructions to test a transistor are covered, as well as NPN and PNP bipolar test circuits you can build if your multimeter doesn't have a transistor test socket.

Chapter 17: DC Motors
What robot book would be complete without a close look at DC motors? This gave me an excuse to obtain and dissect a number of different motors and gearheads. (I was even able to put most of them back together again.)
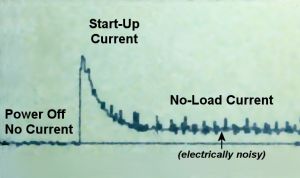
Possibly the longest chapter in the book, it lists the many characteristics of motors and how you might go about selecting the proper motors for your robot. A table provides formulas for converting between different units of rotational force (torque). Learn about the significance and phases of motor current usage.
Gears, gearhead motors, and gear ratios are also described.
Chapter 18: Adding Gearhead Motors
In this chapter, a particular gearhead motor is selected for the line-following robot. Additionally, flyback diodes are added for the protection of the transistors.

Chapter 19: Wheels
From motors, we move on to wheels. The type of wheel makes a bigger difference to a robot than most people think. This chapter describes some of the factors to consider, along with my favorite wheel manufacturer.

Chapter 20: Coupler
If you're fortunate enough to find a matching set of wheels and motors suitable for your robot, then attaching the wheel to the motor shaft isn't a problem.
Usually though, there's a part, called a
coupler, that's needed to connect the wheel to the motor. The couplers I make are compatible with LEGO wheels and gears. I use this kind of coupler on nearly all of my robots. In fact, many people joke that they first look for the coupler whenever I present one of my robots.

After you read this chapter, you'll learn the simple secrets to making a coupler yourself without fancy machinery. And, as always, step-by-step instructions are provided.
Chapter 21: Soldering Equipment
You can only proceed so far in robot building without soldering. Although it can seem intimidating, it's easy with a little practice and encouragement.
This chapter describes some popular soldering tools and supplies, such as a soldering iron, stand, sponge, desoldering bulb, flux, and (of course) solder.
Chapter 22: Soldering and Connecting
You won't want to solder everything together on your robot. In fact, some parts are best left to removable connectors. This chapter describes my personal favorite, the Molex KK-series connector, along with the pieces and tool you need to attach connectors to your robot.

This chapter also begins the soldering process for the line-following robot. Heat-shrink tubing, the hallmark of a professional, is also discussed.
Chapter 23: The Motherboard
The soldering section finishes with the complete schematic of the line-following robot. The choice of point-to-point wiring versus printed-circuit boards is covered, as well as expert tips for successful soldering.
At the end of this chapter, I list some quick techniques for verifying the quality of a circuit board BEFORE connecting it to power.

Chapter 24: Body Building
Few designers put enough time into selecting or making their robot's body. This chapter discloses a timesaving, yet uncompromising, body material. An easy technique for cutting holes in plastic is explained.

Also discussed: standoffs, screws, nuts, washers, nutdrivers, switch hardware, and acetone.
Chapter 25: Launching the Line-Follower
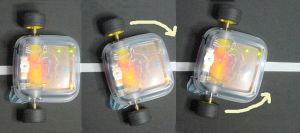
Tweaking and adjusting often make the biggest difference between an ordinary robot and a great robot. This chapter describes simple trials for your line-following robot to complete, and possible corrections if your robot doesn't match the behaviors and values listed for mine.
Frame by frame analysis shows how the line-following robot is able to follow both light and dark lines. The limiting factors are revealed, as well as interesting ideas for enhancements. This is one of my favorite chapters.
Chapter 26: Encore
Where do you go from here?
There are lots of interesting, but more complicated, robotic components that can be pursued for more advanced robots. This chapter describes some of the parts you may want to use on your next robot.

This chapter also discusses some wacky project ideas and some of the autonomous-robot contests held throughout the United States.
Appendix:
The book ends with a discussion of
Ohm's Law, the different names for positive and negative voltage, and the things I accidentally destroyed while making the book.
![[NS-5+NOW.jpg]](https://blogger.googleusercontent.com/img/b/R29vZ2xl/AVvXsEg2Mu9wvj7jIk7V1cwQPz2SmflpefF9k07oLW9l0gwqU_SoCi4adevAtmg89pF0I1TIB5ioZBkBhyphenhyphenwNVf93c_PLcjBrWyl-L4rssAW0hcV3T3n_OICgIhZ7bvHfnrZ3stBb_CFxPZ28LGA/s1600/NS-5+NOW.jpg)